Essentially this is a trip down memory lane, to the npr.me.uk graveyard.
NPR put in a great deal of work to documenting some of the functionality available on the Technicolor TG582n units
I often need to refer to them, so have reproduced some of them below.
I also recently found what appears to be a full clone of the old npr at https://lehollandaisvolant.net/tout/_misc/telnet
Page Under Construction
Telnet Commands for a Thomson / Technicolor Router
Tested on a TG587n V2 but may work on other Thomson routers
Tested on a TG587n V2 but may work on other Thomson routers
Important
Use the routers web interface to backup the router settings before playing.
Reinstalling the backup or in the worst case resetting to factory default and reinstalling the backup should get things back to how they were.
Use these commands at your own risk.
Enable Telnet in Vista or Windows 7
If using Vista or Windows 7, telnet is not enabled by default but it's very easy to do and you only need do this once.
Go to “Control Panel” > “Programs and Features” > click on “Turn windows Features On and Off”
> place a tick in “Telnet Client” > click ok.
Click on "start" in the bottom left corner of the desk top, in the search box (vista) or run box (windows xp) type commandthen press enter.
A black command window should pop up, in here type telnet 192.168.1.254
You will be asked for your routers username and then password, it’s the same ones used to access the routers web interface.
The first thing to do is disable the routers telnet timeout.
This prevents the telnet session unexpectedly closing.

Just enter the two commands as shown above to permanently disable the timeout.
Telnet example
This example displays the IP address of the DNS resolvers held in the router.
Issue the command "dns server route list"
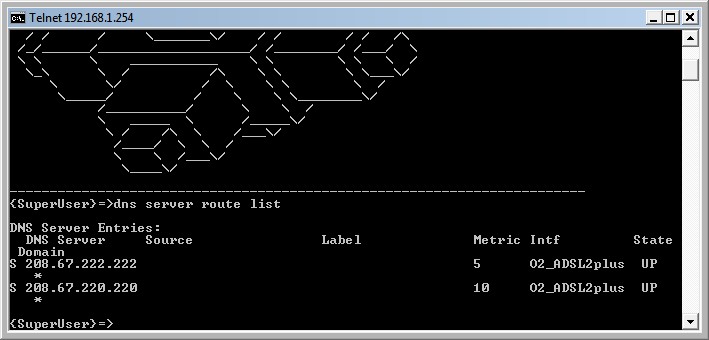
Make a note of the interface shown here, it will be needed in some other commands on this page.
eg. the interface shown above is O2_ADSL2plus this may not be the same as shown by your router.
Set the router to use OpenDNS --R8 Firmware
| Command | Comments |
|---|---|
| dns server route list | List all DNS resolvers set in the router. ( optional ) |
| dns server route flush | Clear |
| dns server route add dns=208.67.222.222 metric=0 intf=Internet | See note (1) below regarding "intf=Internet" |
| dns server route add dns=208.67.220.220 metric=0 intf=Internet | See note (1) below regarding "intf=Internet" |
| dns server route list | List all DNS resolvers set in the router. (just checking) |
| saveall | Make the change permanent. |
The ISP DNS settings may creep back in over time.
A metric value of 0 has been used to give these new DNS settings priority over any ISP settings.
eg the lower the metric the higher the priority.
Undo, return to obtaining DNS resolvers via DHCP
| Command | Comments |
| dns server route flush | Clear |
| dns server route list | List all DNS resolvers set in the router. (just checking) |
| saveall | Make the change permanent. |
Set the router to use OpenDNS --New R10 Firmware
| Command | Comments |
|---|---|
| dns server forward dnsset list | List all DNS resolvers set in the router. ( optional ) |
| dns server forward dnsset flush | Clear |
| dns server forward dnsset add set=0 dns=208.67.222.222 metric=0 intf=Internet | See note (1) below regarding "intf=Internet" |
| dns server forward dnsset add set=0 dns=208.67.220.220 metric=0 intf=Internet | See note (1) below regarding "intf=Internet" |
| dns server forward dnsset list | List all DNS resolvers set in the router. (just checking) |
| saveall | Make the change permanent. |
The ISP DNS settings may creep back in over time.
A metric value of 0 has been used to give these new DNS settings priority over any ISP settings.
eg the lower the metric the higher the priority.
Undo, return to obtaining DNS resolvers via DHCP
| Command | Comments |
| dns server forward dnsset flush | Clear |
| dns server forward dnsset list | List all DNS resolvers set in the router. (just checking) |
| saveall | Make the change permanent. |
Update OpenDNS using Dynamic DNS
| Command | Comments |
|---|---|
| dyndns service list | View existing settings -- It's the "custom" section we'll be changing |
| dyndns service modify name=custom server=updates.dnsomatic.com updateinterval=10800 | Change service provider to dnsomatic.com updateinterval is 3 hours. (10800 seconds) |
| saveall | Make the change permanent. |
Ensure your opendns account is set to -- enable dynamic IP update
Go to www.dnsomatic.com , sign in with your OpenDNS username / password.
While there, enable update opendns.
Go to the routers web interface Toolbox > Dynamic DNS > Configure :-
Tick "Enabled"
Interface -- Internet -- See Note (1)
Username -- Opendns username
Password -- Opendns password
Service -- custom
Host -- enter your opendns network label or enter the catch all -- all.dnsomatic.com
Click "Apply"
Check the routers event log to confirm "dyndns host has been updated".
Disable telnet timeout
| Command | Comments |
|---|---|
| env get var=SESSIONTIMEOUT | Check existing setting. |
| env set var=SESSIONTIMEOUT value=0 | Disable session timeout. |
| saveall | Make the change permanent. |
Get router stats
| Command | Comments |
| xdsl info expand=enabled | See Telnet Scripting for a method to get these stats quick. |
Force connection modulation mode to ADSL1, ADSL2 or ADSL2+ (also disable Annex M)
A useful byproduct of this command is that it causes a resync.
ie resetting the modulation to default (ie no change) can be used to force the router to perform a resync.
| Command | Comments |
|---|---|
| xdsl debug multimode | Show all enabled modes. (optional) |
| xdsl debug multimode config=t1.413issue2+g992.1_annex_a | This forces ADSL1 (ie g992.1 Annex A) |
| xdsl debug multimode config=t1.413issue2+g992.3_annex_a | This forces ADSL2 (ie g992.3 Annex A) |
| xdsl debug multimode config=t1.413issue2+g992.5_annex_a | This forces ADSL2+ (ie g992.5 Annex A) |
| xdsl debug multimode config=t1.413issue2+g992.1_annex_a+g992.3_annex_a+g992.3_annex_l+g992.5_annex_a | Disable Annex M on all connection modes |
| xdsl debug multimode config=t1.413issue2+g992.1_annex_a+g992.3_annex_a+g992.3_annex_l+g9
92.3_annex_m+g992.5_annex_a+g992.5_annex_m |
Default, all modes available. |
| saveall | Use one of the above commands then saveall ! |
Drop and Re-start ADSL (resync)
| Command | Comments |
|---|---|
| xdsl config status=down | Drop ADSL connection |
| xdsl config status=up | Raise ADSL connection |
Drop / Start PPP Session
With some ISP connections this may change your gateway it may also change your IP address.
Useful if your ISP sometimes has congested gateways.
| Command | Comments |
|---|---|
| ppp ifdetach intf=Internet | Drop PPP |
| ppp ifattach intf=Internet | Connect PPP |
Remote Access Page
Remote Access to a Thomson Router
If you need help with telnet commands, see above.
There's a few different options here.
a) HTTP remote access to the routers user interface from across the internet.
b) HTTPS remote access to the routers user interface from across the internet. This gives the benefit of encrypted access.
c) Telnet remote access to the router from across the internet.
All of these options have a security risk. The router will be accessible to anyone on the internet and given enough time the password could be cracked.
We can reduce this security risk, but not eliminate it, by:
d) Deleting all the user names and passwords and creating a new unique username and password.
e) Restrict the IP or IP range which can access the router.
f) Ensure every PC is running a software firewall (eg windows firewall)
Lastly use dynamic DNS to maintain easy access for those on a dynamic IP address.
Initially -- configure the routers username privileges.
For this to work the routers login username must have sufficient privileges to allow remote access.
If the routers username has the role of "SuperUser" or "root" then those will have sufficient privilege.
If the routers username is admin or Administrator then the following commands are needed to allow remote access.
| Commands | Comments |
|---|---|
| user list | Optional Lists all usernames together with their roles. |
| mlp role addpriv name=Administrator access=anyaccess service=anyservice | Increase the privileges of all usernames with the role Administrator |
| saveall |
Option a)
HTTP Remote Access
| Commands | Comments |
|---|---|
| service system list name=HTTP expand=enabled | Optional -- see the settings before we start. |
| service system ifadd name=HTTP group=wan | Join the HTTP server to the WAN |
| service system modify name=HTTP state=enabled | Not usualy required as HTTP is already enabled for LAN. |
| service system list name=HTTP expand=enabled | Optional -- see the changes. |
| saveall | Make permanent |
Use a "Open Port Check" web site such as http://canyouseeme.org/
Test that port 80 is open. If the port is open then HTTP remote access should work.
Undo -- remove the above settings.
| Commands | Comments |
|---|---|
| service system list name=HTTP expand=enabled | Optional -- see the changes. |
| service system ifdelete name=HTTP group=wan | Remove HTTP server from WAN |
| saveall | Make permanent |
Option b)
HTTPs Remote Access
| Commands | Comments |
|---|---|
| service system list name=HTTPs expand=enabled | Optional -- see the settings before we start. |
| service system ifadd name=HTTPs group=wan | Join the HTTPs server to the WAN |
| service system modify name=HTTPs state=enabled | Enable HTTPs. |
| service system list name=HTTPs expand=enabled | Optional -- see the changes. |
| saveall | Make permanent |
Use a "Open Port Check" web site such as http://canyouseeme.org/
Test that port 443 is open. If the port is open then HTTPs remote access should work.
Undo -- remove the above settings.
| Commands | Comments |
|---|---|
| service system list name=HTTPs expand=enabled | Optional -- see the changes. |
| service system modify name=HTTPs state=disabled | Disable
HTTPs server. |
| service system ifdelete name=HTTPs group=wan | Remove HTTPs server from WAN |
| saveall | Make permanent |
Option c)
Telnet Remote Access
| Commands | Comments |
|---|---|
| service system list name=TELNET expand=enabled | Optional -- see the settings before we start. |
| service system ifadd name=TELNET group=wan | Join the TELNET server to the WAN |
| service system list name=TELNET expand=enabled | Optional -- see the changes. |
| saveall | Make permanent |
Use a "Open Port Check" web site such as http://canyouseeme.org/
Test that port 23 is open. If the port is open then TELNET remote access should work.
Undo -- remove the above settings.
| Commands | Comments |
|---|---|
| service system list name=TELNET expand=enabled | Optional -- see the changes. |
| service system ifdelete name=TELNET group=wan | Remove TELNET server from WAN |
| saveall | Make permanent |
Option d)
More Secure Username and Password
Note:
This method for changing the username, password and role does not work with all firmware versions.
ie doesn't work with R10 firmware.
Most Thomson routers have a SuperUser or admin account. To improve security we need to replace this with something less obvious.
This deletes all users, creates a new user hopefully with a strong name and password.
The new user has full "root" privileges -- the highest privileges.
| Commands | Comments |
|---|---|
| user flush | Delete all usernames and passwords |
| Exit telnet session and start a new one. | No username or password needed. |
| user add name=MyUserName password=MyPassWord role=root defuser=enabled defremadmin=enabled deflocadmin=enabled | Replace
MyUserName and MyPassWord with ones of your own. |
| saveall | Make permanent. |
Alternatively, see the following method for creating a username with root privileges.
http://npr.me.uk/telnet.html#root
If something goes wrong or you forget the new user details - A factory reset will restore the original settings.
Option e)
Restrict Remote Access to a Specified IP Range
Warning -- If you fail to assign the LAN IP's first you will be locked out of the router -- It's then factory reset time.
| Commands | Comments |
|---|---|
| service system ipadd name=HTTP ip=192.168.1.[1-254] | Important -- Assign the LAN IP range first |
| service system ipadd name=HTTP ip=93.96.1.1/24 | Assign single IP or IP range you wish to allowed remote access. |
| service system list name=HTTP expand=enabled | Optional -- see the changes |
| saveall | Make permanent. |
If required, repeat with HTTPs and / or TELNET
Undo -- Remove IP Range Restriction
Warning -- If you fail to unassign the LAN IP's last you will be locked out of the router -- It's then factory reset time.
| Commands | Comments |
|---|---|
| service system ipdelete name=HTTP ip=93.96.1.1/24 | Unassign IP range allowed remote access |
| service system ipdelete name=HTTP ip=192.168.1.[1-254] | Important -- Unassign the LAN IP range last |
| service system list name=HTTP expand=enabled | Optional -- see the changes |
| saveall | Make permanent. |
If required, repeat with HTTPs and / or TELNET
Remote Access using Dynamic DNS
The dynamic DNS updater can easily be setup in the routers GUI.
You just need a free account at http://dyn.com/dns/dyndns-free/ and away you go.
PPP connection details
The command required is:
ppp ifconfig intf=Internet user=x@a password=secret status=enabled
Seemingly one can't ppp ifconfig an interface which is administratively up, so one would have to actually:
ppp ifdetach intf=Internet
ppp ifconfig intf=Internet user=x@a password=secret status=enabled
ppp ifattach intf=Internet
Special password?
If you need to include an equals symbol, example: ppp ifconfig intf=Internet user=x@a password="Whoops=123" status=enabled.
Close
Bye bye.